Sunday, November 11, 2012
Halloween 2012, looking forward to 2013
Hope all of you had the best Halloween you could. This year was definitely challenging for many, and continues to challenge some of us. I have included a video of my haunt this year, it is pretty wimpy but I at least got some decorations out. I am already looking forward to next year and what I would like to accomplish. This includes laying out a much better haunt, providing a safe path and a scary path. I also plan on redoing the leer and wallbreaker ghosts with mechanical linkages instead of strings. I hope to offer several kits.
Tuesday, October 23, 2012
New Cloaked FCG
My new Cloaked FCG is done! Some new ideas in this ghost are the arm and the way the head moves. The arms form a 2 bar linkage that causes the hands to raise as the arm is extended. And the head is rigged so that as the body reaches the lowest point the head looks up. Hope you have a great Halloween!
Sunday, September 16, 2012


Saturday, September 15, 2012
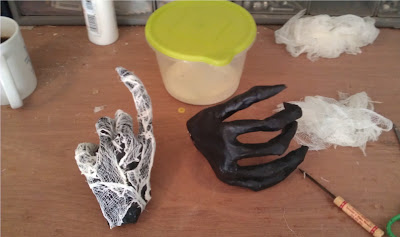
Hey everybody. Wanted to update the progress of the Cloaked Ghost. This will be an entry about finishing the hands, fixing the hood, and starting the cheese cloth application. My next entry will show how I add all the cheese cloth and display the final ghost.
My previous entry showed how I used newspaper, tape and paper mache to make the hands. Once the hands are dry I paint them flat black...
 Next I use fabric stiffener to apply small pieces of cheesecloth. I cut plenty of pieces around 2-3 inches square, any smaller and I cannot spread the cheese cloth out after dipping it in the fabric stiffener and wringing it out.
 I usually start with the fingers and work my way onto the hand.
 The final effect under the black light...
 Next, I was not happy with the way the cloak looked in my test run (below)
I wanted to keep the void just where the head was supposed to be, without the black cloth blocking any part of the body as the head turned. After some experimentation, I found that trimming the hood gave the desired effect. Here is the trim job...
Next, I was not happy with the way the cloak looked in my test run (below)
I wanted to keep the void just where the head was supposed to be, without the black cloth blocking any part of the body as the head turned. After some experimentation, I found that trimming the hood gave the desired effect. Here is the trim job...
 The result test run with some cheese cloth and black light shows how this technique allows the void to remain without obscuring the body as the head turns...
Finally, with the body clearly visible under the void, I decided to add some detail to the cheesecloth on the body. This will be done by cutting ragged strips long enough to reach the bottom, placing them on the body, the applying some Elmer glue/water mix in strategic spots to secure the cheese cloth in place. The idea is shown below with the initial strip placed...
The result test run with some cheese cloth and black light shows how this technique allows the void to remain without obscuring the body as the head turns...
Finally, with the body clearly visible under the void, I decided to add some detail to the cheesecloth on the body. This will be done by cutting ragged strips long enough to reach the bottom, placing them on the body, the applying some Elmer glue/water mix in strategic spots to secure the cheese cloth in place. The idea is shown below with the initial strip placed...
 Thanks for looking. The next post should finish up this ghost!


Friday, September 7, 2012
Animated Cloaked Ghost Part II
The hands are just about done, now it is time to dress the ghost using black cloth. I built the hands using the same technique as the previous ghosts. First build an armature using small newspaper balls for knuckles, and masking tape to hold everything together.
 Once the hands are together I pose them, and if needed secure them so they hold the pose while the paper mache dries.

 The following video shows the ghost with the rough hands and the basic cloak outline in place.
I am also getting questions about how I figure linkages. The following video shows how I lay everything out with cardboard and tacks to at least get close (this is after several sketches). I take the final strips and use them to check the fit as I assemble the actual linkages. As I built the ghost, the location of the motor or arms would change, and I would modify the cardboard mock-up accordingly. Note that the head and left arm linkages were close, but the right arm prototype did not capture the complexity of that movement. I also spend a lot of time sitting and watching things in motion, and tweaking until things look right.
The following video shows the ghost with the rough hands and the basic cloak outline in place.
I am also getting questions about how I figure linkages. The following video shows how I lay everything out with cardboard and tacks to at least get close (this is after several sketches). I take the final strips and use them to check the fit as I assemble the actual linkages. As I built the ghost, the location of the motor or arms would change, and I would modify the cardboard mock-up accordingly. Note that the head and left arm linkages were close, but the right arm prototype did not capture the complexity of that movement. I also spend a lot of time sitting and watching things in motion, and tweaking until things look right.


Thursday, September 6, 2012
Cloaked Ghost WIP part 1
I finally got started on a new ghost. This will be another version of the cloaked ghost. The original cloaked ghost is a product of Pumpkinrot..
 Grim came up with his own version...
 My ghost will be modeled after Grim's version. What I really like about Grim's version is the way the void in the hood opens into the body of the ghost. The animated cloaked ghost will have 3 movements. The head will look back and forth. The right hand will hold a lantern, and it will extend the lantern out as it keeps watch over all TOT walking by. Finally, the left hand will point at the TOTs as they walk by, slowly moving back and forth as if pointing to each TOT.
The video below shows the armature with the basic movement done...
Next steps will be completing the hands and arms with mache, and forming the hood. The ghost will use RIT treated cheese cloth; the challenge will be to recreate the void as in Grim's ghost with the UV reactive cloth.
My ghost will be modeled after Grim's version. What I really like about Grim's version is the way the void in the hood opens into the body of the ghost. The animated cloaked ghost will have 3 movements. The head will look back and forth. The right hand will hold a lantern, and it will extend the lantern out as it keeps watch over all TOT walking by. Finally, the left hand will point at the TOTs as they walk by, slowly moving back and forth as if pointing to each TOT.
The video below shows the armature with the basic movement done...
Next steps will be completing the hands and arms with mache, and forming the hood. The ghost will use RIT treated cheese cloth; the challenge will be to recreate the void as in Grim's ghost with the UV reactive cloth.

Sunday, August 12, 2012
Hey everyone. I found out someone needed the templates for the wallbreaker, so I have made the template document available under how-tos.
I think I have about 1 more month of house remodeling left in me. Already told wife that I want to build some ghosts. I figure I will have September and October to break in the new shop, which is a small 1 car garage that was added to the original 2 car garage. I finally have my own shop!
First will be a new cloaked ghost. I want to add to the FCG idea by linking at least the hands and head to the arms, so I get some additional movement in addition to the typical 3 line marionette.
Second will be the third version of the leer ghost. For this one I will try to get away from using lines, and I am adding a pivot point at the base of the torso. The ghost will use 2 motors, 1 to raise and lower the body at the new pivot point, and 1 to drive the original head and arm movement from the last one.
Friday, March 23, 2012
Static Ghost by GrimleeFeindish

Thursday, March 15, 2012
I'm not a ghost
Quick note to say hi, that I am not a ghost myself, but the bug is starting to bite again. May have to build a new host of ghosts soon!
Subscribe to:
Posts (Atom)