Saturday, July 13, 2013

I am beginning construction of a new ghost, based loosely on the phantoms from Scooby Doo.  A lot of thought went into the design which I was initially going to build for the Haunt Forum $20 prop contest, so I thought I would post the sketches I will be using to build the ghost.  This will attempt to use an internal crank and lever mechanism to introduce a variety of motions that will be reliable and easy to maintain.  The first sketch are the various positions of the ghost from the Scooby Doo video.

In the following sketch is how I hope the final ghost appears, and the basic movements.  The head will move up and down from the shoulders, the head will turn back and forth, and the shoulders will rock to introduce the arm movement.


The following 2 sketches detail the mechanisms, at least enough for me to build it.  I will attempt to have the eye and mouth shape change, and may also add finger movement.


More to come, thanks for reading.

Thursday, March 28, 2013

$20 prop contest ideas

I am still searching for ideas for the $20 prop contest, and I have a couple brewing. The first was originally inspired by this post I found on pumpkinrots site, the image is by rainbowzebra93:
What I like about this is the long flowing ghost, it also led me to the idea of using some form of black mesh to build a very 3 dimensional form, the leave lots of gaps in the cheese cloth to give the impression of a very hollow ghost. Kinda like a previous ghost I built, but with more voids to give the impression of something hollow.
The second idea is for an animated ghost with more of an emphasis on the sculpture than I usually do, and with different animation using a lot of cams with a deer motor. After all, it is a $20 prop contest, and you can make a lot of cams with scrap wood. The basic movement is based on one of my all time favorites, the Green Ghost from Scooby Doo. I would try some ideas I have had to build a very detailed armature from paper mache, give it a basic posture like in the Scooby Doo ghost, and then animate it as much as I can using a deer motor. Another image I want to incorporate is by (Divinity II: Ego Draconis Art & Pictures)
Next step is to sketch something out and start planning the animations.

Tuesday, March 19, 2013

Hi everyone. I hate moving, I always buy a house with potential, which means it needs a lot of work. I will be done with the last major job this weekend (redoing the wood floors), just in time for the HauntForum $20 prop contest! I will build a ghost, animated with a salvaged deer motor, I just don't know what yet. I am casting around, trying to come up with something that feels new, a posture and a motion that is different. I do know that I want to take the sculpting up a notch, detailed paper mache armature, and introducing a lot of texture with the cheesecloth. Whatever it ends up being, I will be posting updates. More to come soon!

Sunday, November 11, 2012

Halloween 2012, looking forward to 2013

Hope all of you had the best Halloween you could. This year was definitely challenging for many, and continues to challenge some of us. I have included a video of my haunt this year, it is pretty wimpy but I at least got some decorations out. I am already looking forward to next year and what I would like to accomplish. This includes laying out a much better haunt, providing a safe path and a scary path. I also plan on redoing the leer and wallbreaker ghosts with mechanical linkages instead of strings. I hope to offer several kits.

Tuesday, October 23, 2012

New Cloaked FCG

My new Cloaked FCG is done! Some new ideas in this ghost are the arm and the way the head moves. The arms form a 2 bar linkage that causes the hands to raise as the arm is extended. And the head is rigged so that as the body reaches the lowest point the head looks up. Hope you have a great Halloween!

Saturday, September 15, 2012

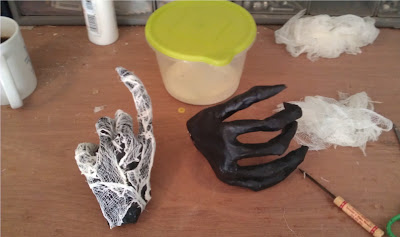
Hey everybody. Wanted to update the progress of the Cloaked Ghost. This will be an entry about finishing the hands, fixing the hood, and starting the cheese cloth application. My next entry will show how I add all the cheese cloth and display the final ghost. My previous entry showed how I used newspaper, tape and paper mache to make the hands. Once the hands are dry I paint them flat black...
Next I use fabric stiffener to apply small pieces of cheesecloth. I cut plenty of pieces around 2-3 inches square, any smaller and I cannot spread the cheese cloth out after dipping it in the fabric stiffener and wringing it out.
I usually start with the fingers and work my way onto the hand.
The final effect under the black light...
Next, I was not happy with the way the cloak looked in my test run (below) I wanted to keep the void just where the head was supposed to be, without the black cloth blocking any part of the body as the head turned. After some experimentation, I found that trimming the hood gave the desired effect. Here is the trim job...
The result test run with some cheese cloth and black light shows how this technique allows the void to remain without obscuring the body as the head turns... Finally, with the body clearly visible under the void, I decided to add some detail to the cheesecloth on the body. This will be done by cutting ragged strips long enough to reach the bottom, placing them on the body, the applying some Elmer glue/water mix in strategic spots to secure the cheese cloth in place. The idea is shown below with the initial strip placed...
Thanks for looking. The next post should finish up this ghost!